Seacocks demystified
Seacocks are those small, tiny pieces of metal that day after day struggle to keep water out of our nutshell. They are forgotten, concealed, underrated and bullied. And misunderstood.
A seacock replacement cost lies in the range of 100-200€, still yachtsmen often argue whether replace an only ten years old ball valve.
As a yacht surveyor I find very few inspected craft not requiring at least one seacock replacement. Usually a pre purchase survey is carried out with the boat well on the hard, so the greater part of a seacock replacement cost – haul the boat out – has been already paid, yet a lot of strain is to be put on the topic.
What standard?
European yachts, at least after June 16, 1998, must comply to Recreational Craft directive, that suggests (yes, it’s a suggestion, not a requirement) that boat builders refer to EN ISO harmonised standards for their craft. Pertinent standard for seacock is ISO9093, split in 9093-1 for metallic fittings and 9093-2 for non-metallic ones. The standard is not of much help itself, being a bare guideline for seacock production and installation.
First of all, ISO rule states that a metallic seacock material “shall be corrosion-resistant, or shall have protection against corrosion“, where corrosion-resistant means “Material used for a fitting which, within a service time of five years, does not display any defect that will impair tightness, strength or function“; more or less same definition for protection against corrosion. The big trick is that there is no mean to determine such characteristic, so is all to builders to decide if their seacocks are corrosion resistant enough.
Seacock material
Convenient materials for sea valves and pertinent fittings are mainly four: brass, bronze, stainless steel and reinforced plastic (the latter covered by ISO9093-2), the first two being by far the most used.
Brass is a Copper/Zinc alloy in various ratios, with a certain amount of other metals among which Tin, Iron, Aluminium. It is well known that hull anodes are made out of zinc, because it’s a very less noble metal than other found onboard, so zinc will be the first component to go. So anybody can understand that common brass is not desirable as a seacock material, unless it is the so-called “De-Zincification Resistant” (DZR) Brass, an alloy which a small amount of Arsenic has been added to, and that should be submitted to a double high temperature treatment, the first at 250°C and the second at 500-550°C. Corrosion resistance capability of DZR brass is close to that of bronze, but other kind of brass are not suitable for below waterline use.
Bronze is a Copper alloy in which no Zinc is found (except for Gunmetal); usually combined with Tin, which gives a high resistance to corrosion, may be made of Copper/Aluminium or Copper/Silicon. Please note that Manganese Bronze, often used for propellers, is actually a brass, being an alloy with 37% Zinc content.
Stainless Steel is often stainless. But not always: it’s sensible to crevice corrosion, occurring when the metal comes into contact with a low oxygen content water. It is very likely to find such water inside seacocks, so stainless steel, otherwise an excellent material, is not worth its price as a seacock substance.
Reinforced plastic is a real alternative; totally corrosion resistant, may lack in mechanical properties, that is balanced by a bigger size, often so big that seacock doesn’t fit in place.
So, where we are now? As a first conclusion, NEVER use brass below the waterline. You may want to be sure to choose a good quality bronze fitting, or a plastic one, if it can fit.
Another question is the type o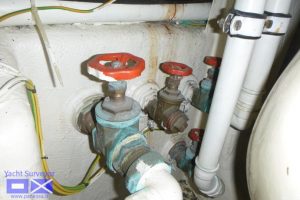 f valve that should be used. ISO9093 requires that seacock design shall permit a visual check of the open/closed position. The so beloved gate valves like those on the right lack this feature, so they must be avoided.
Installation
A few words about installation:
- All components of a seacock – skin fitting, valve and hose fitting – must be galvanically compatible, that is to say they should be either plastic or of the same metal. Avoid a brass-steel-bronze patchwork (and avoid brass at all).
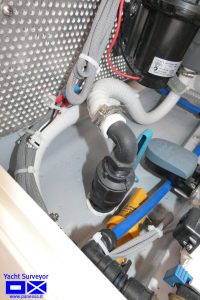
- According to ISO9093 the valve shall be either directly fitted to the hull or to a thru-hull fitting, whilst ABYC H-27 admits that, if space constraints prevent Thru-hull fittings and seacocks from being connected directly, then one non-flexible component (such as an elbow) may be installed. So, on European yachts elbows between valve and skin fitting are not allowed, but are permitted on American boats (see the opening picture – that was a CE-marked craft).
- Avoid castle-like connector buildings. European standards don’t require a load test, but ABYC does, asking for a 500 pounds (227kg) load to be applied to the inboard end of the assembly, and we know that momentum increases with arm length, so it’s unlikely that a thru-hull/seacock/elbow/socket/tee/valve/nipple/hose fitting could withstand such load. As said, European boats must not pass a test, but you want to be sure that the seacock won’t break under your hand operation.
A couple quizzes: what’s wrong with these pictures?
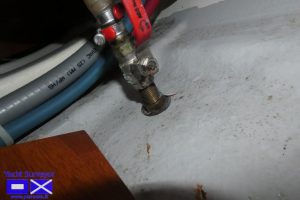 Exposed thread is too long; skin fitting thread is the weakest part of all the assembly, and should not be overexposed like this.
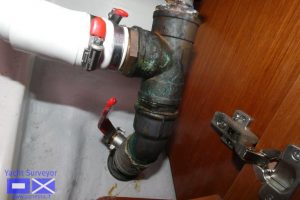 Too many components along this assembly; I may count a skin fitting, a seacock, an elbow, a nipple, a tee and two hose fittings. This one is the same boat of previous picture.
Sizes matter
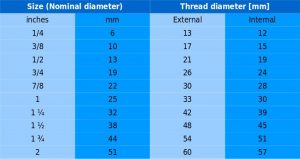
I’d like to close with a consideration about seacock sizes. I’ve always been puzzled by the way plumbing system components are measured, until I found the explanation. A component size was once referred to internal diameter of the pipe, so we had 3/4″, 1″, 2″ pipes and son on, and the wall thickness of threaded components was so standardised according to pipe size. Technology steps forward, and mechanical properties of material increase, so the wall thickness once in use is now too great; what to do? decrease thread diameter? That would have meant that an old component would no longer have been usable, so the decision was to keep the thread size and increase the internal pipe gauge. So now, to determine a fitting size we have to measure the thread diameter – external for male fittings and internal for female ones, and refer to a table like that reported below (measures are approximated). 